日本語ページ
This page contains the manual for older version distributed on Booth store.
Please check the other site for the manual for Steam store version.
Online Manual v1.5.4 (Update at 2024/02/17)
Index
- Application Startup
- Basic Operation
- Change Settings on SteamVR Dashboard
- Basic Settings
- Image Saving Function / Settings
- Translation and Text Recognition Function / Settings
- 2D Code Reading Function / Settings
- Advanced Settings
- System Preferences
- Change Preference from Desktop
- Transfer of configuration data
Appendix
1. Application Startup ▼
After extracting the compressed file downloaded from booth, execute “VRHandsFrame.exe” in the folder.
After execution, SteamVR will launch at the same time.
(If SteamVR is already running, only the application will launch)
When you start the application for the first time, the Terms of Use will be displayed.
Please Read that terms and click “Agree and Launch App”.
* the application does not work properly if it is placed in a location containing multi-bytes characters.
please be careful where you install the application.
The first time VRHandsFrame is launched, it will be registered in the startup settings of SteamVR.
After the second time, it will automatically launch linked to the startup of SteamVR.
Each direct execution of VRHandsFrame.exe will overwrite the startup settings.
If you have moved the location of the app folder or want to run a different version of the app, run VRHandsFrame.exe directly from the target folder to override the startup settings.
If you want to remove the auto startup setting, please set it in “System Preferences“, or change it from the setting on the SteamVR side.
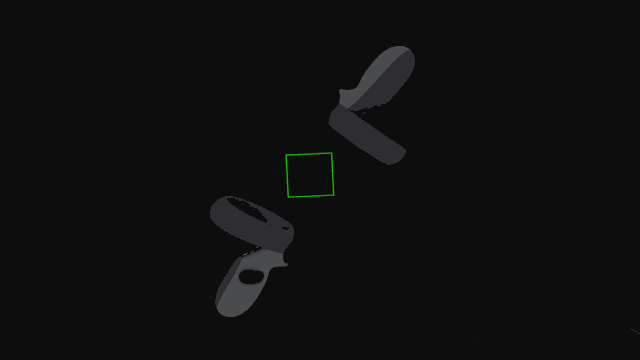
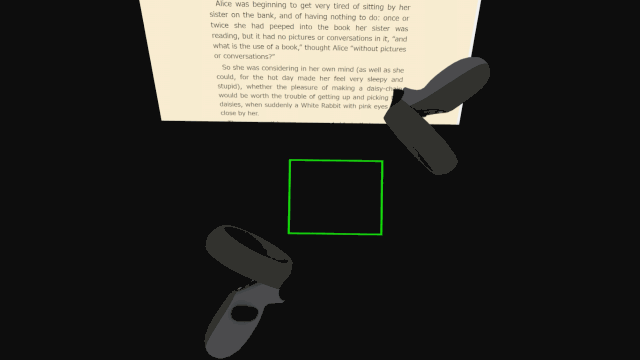
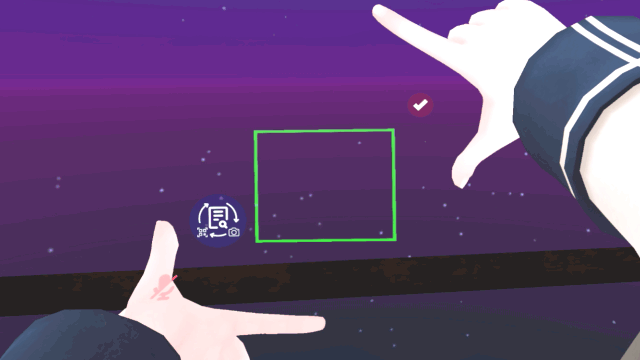
2. Basic Operation ▼ ▲
[Step 1]
Hold both hands close together while pressing the grip buttons on the two-handed controller.
Hold a hand-sign pose as if you were forming a frame.

[Step 2]
While you keep the framing pose, a white frame continue to generate in a clockwise direction.
When frame generation is complete, the frame color changes.

[Step 3]
After the frame color changes, the assigned function becomes available.
When the controller is moved with the grip held down, the frame scales accordingly.
Once the frame is fully generated, the angle and positioning of the controller can be changed.
[Step 4]
Move the controller to bring the object into the frame.
Pressing the right trigger while holding the grip down executes the assigned function.
(It is possible to change in the settings whether the left or right trigger is used for function execution)
Two different functions can be performed depending on the position of the two hands at the start of frame generation.
(Image saving and translation functions are assigned by default)

If both left and right controller triggers are pressed, the frame is fixed at the position at the moment of pressing, and the timer function is activated. (Default timer is 5 seconds)
If the trigger/grip presses interfere with actions of each VR game, you may avoid that interference by changing the “Reverse Trigger Roles and Grip Roles” or “Use Button/Trigger Touch Action” items in the Advanced Settings.
Mode Switch in VR
You can switch the mode you want to perform by pressing the trigger on the left controller in VR.
(It is possible to change in the settings whether the left or right trigger is used for switching)
Each time the trigger is pressed, the functions that can be executed are switched in the following order.
“Image Saving” >>> “Translation” >>> “2D code reading” >>> “Image Saving” >>> …
The state of the mode switched on VR is not saved. If you want to change the initial mode, please set [Default Mode] on the VR dashboard.
Note for operating frames and specifying areas
・ If the area in the frame is extremely too narrow or too wide, the area cannot be determined.
・ The frame color is used to determine the area. If the RGB values of the background/object are extremely similar to the frame color, it may fail to recognize the area.
・ When determining an area, it refer to either the left or right field of view. If you have trouble specifying the area, try executing the function with one eye closed. (You can switch which eye to refer to in the settings)
3. Change Settings on SteamVR Dashboard ▼ ▲
Selecting the VRHandsFrame icon on the SteamVR Dashboard with the pointer will bring up the settings screen. Various settings can be changed here.
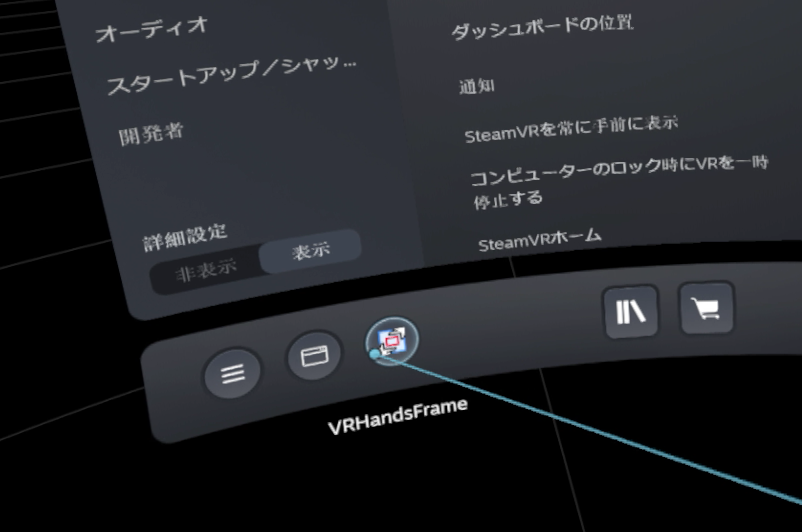

To change the display language, use the [LANGUAGE] button at the bottom left of the dashboard. It supports Japanese and English.
To change the settings other than [System Preferences], select the red button “Save” on the dashboard.
VRHandsFrame settings can be switched between “Global Settings” and “Application Settings”.
[Global Settings]
This setting is commonly available regardless of the game being launched.
[Application Settings]
Individual settings that can be saved for each game/application running on SteamVR.
To switch settings, select the green button on the dashboard “Use Global settings” or “Use Application Settings”.
*Caution
If you switch settings before selecting the “Save” button, the settings before saving will be lost. Please be careful.
4. Basic Settings ▼ ▲
Select the “Basic” tab on the dashboard to change basic settings.
Basic Settings 1
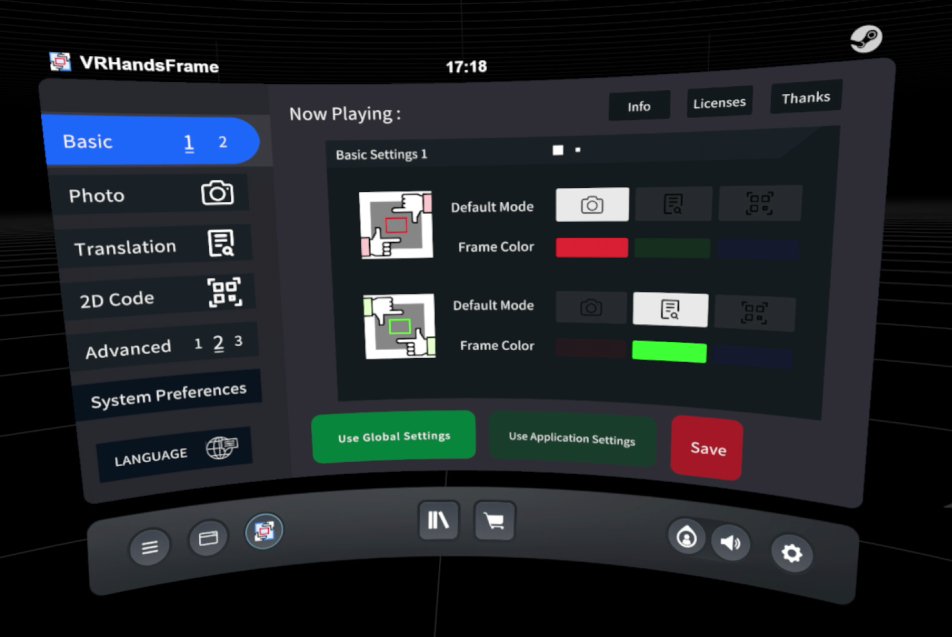
[Default Mode]
Select default mode to be assigned to the hand sign from “Photo”, “Translation”, and “2D Code”.
[Frame Color]
Sets the color of the frame to be assigned to the hand sign shown on the left.
Basic Settings 2
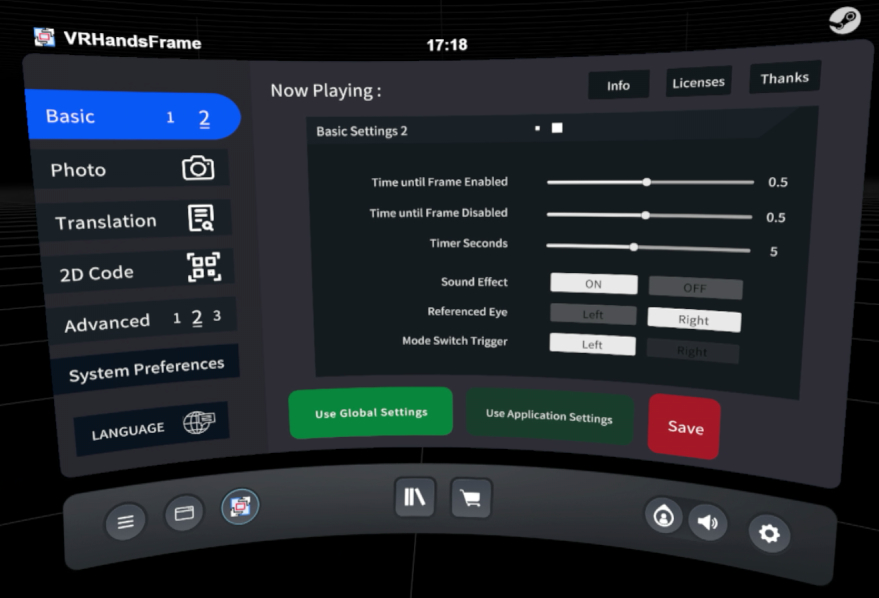
[Time until Frame Enabled]
Sets the duration required to maintain the hand sign before the function becomes available.
[Time until Frame Disabled]
Sets the duration from when the hand sign is released until the frame is completely erased (returns to the standby state).
[Timer Seconds]
Sets the number of seconds to count when using the timer function.
[Sound Effect]
Sets sound effect ON/OFF.
[Referenced Eye]
Choose which eye’s view to refer.
【Mode Switch Trigger】
Select the left or right trigger to use for mode switching in VR.
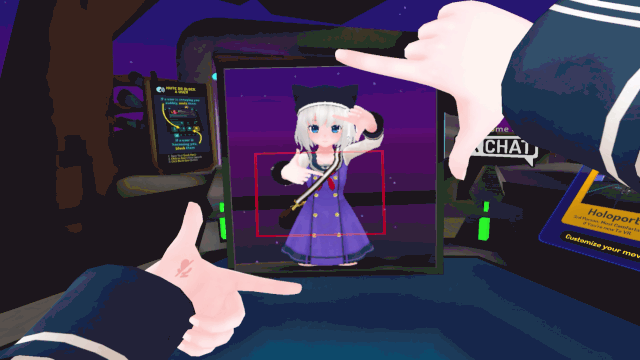
5. Image Saving Function / Settings ▼ ▲
The area within the frame is cropped as an image.
Since the VR view is cropped as it is, the UI of another overlay application may be reflected in the image.
In the default state, the images are saved to the folder “VRHandsFrame” in My Pictures. In addition, captured images are saved in subfolders for each application.
Please Select to the “Photo” tab to change settings.
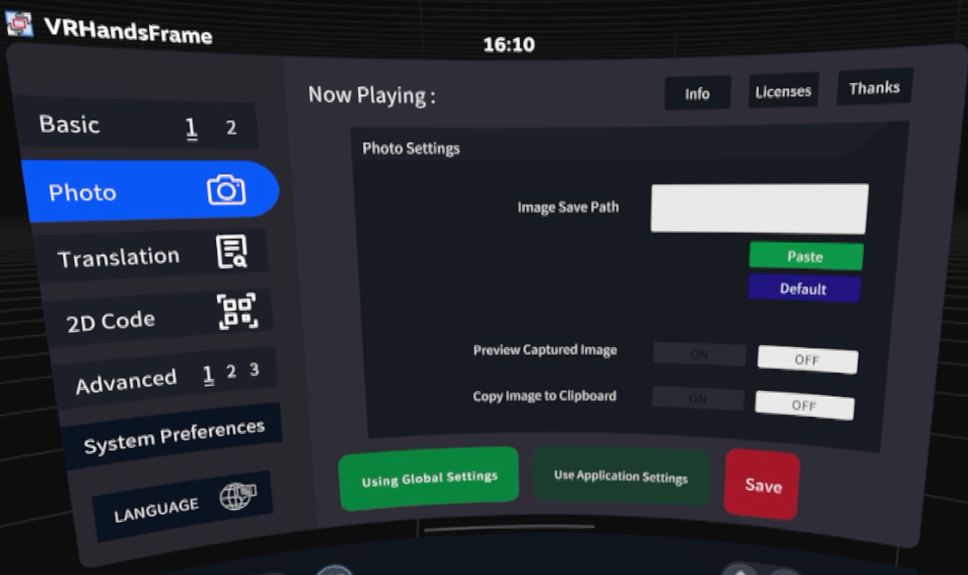
[Image Save Path]
You can set the path to save the image. Copy the path you want to save on the desktop and select the “Paste” button. If you want to restore the default settings, select the “Default” button.
[Preview Captured Image]
Switch ON/OFF of captured images preview in VR. Default is OFF.
While the image preview panel is displayed, pressing the right trigger saves the image, and pressing the left trigger cancels saving the image and exits.
[Copy Image to Clipboard]
Switch ON/OFF of copying captured image to clipboard. Default is OFF.
6. Translation and Text Recognition Function / Settings ▼ ▲
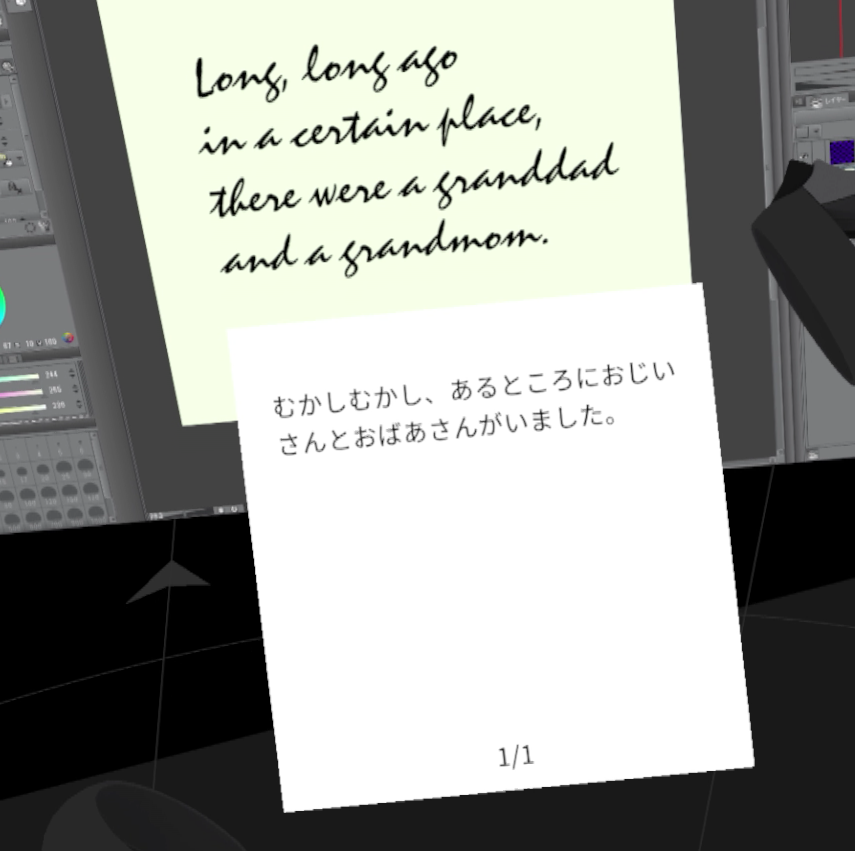
Recognizes characters reflected in the image within the frame and translates them into the respective languages.
After the translation results are displayed, you can page forward with the right hand trigger and backward with the left hand trigger. To exit the translation function, press the right trigger at the end of the page, or press both hand triggers simultaneously in the middle of the page.
By additional settings on the user side, it is possible to reduce limits of calling the translation engines and to switch between high-precision character recognition engines.
Text Recognition and Translation Engine Comparison Table
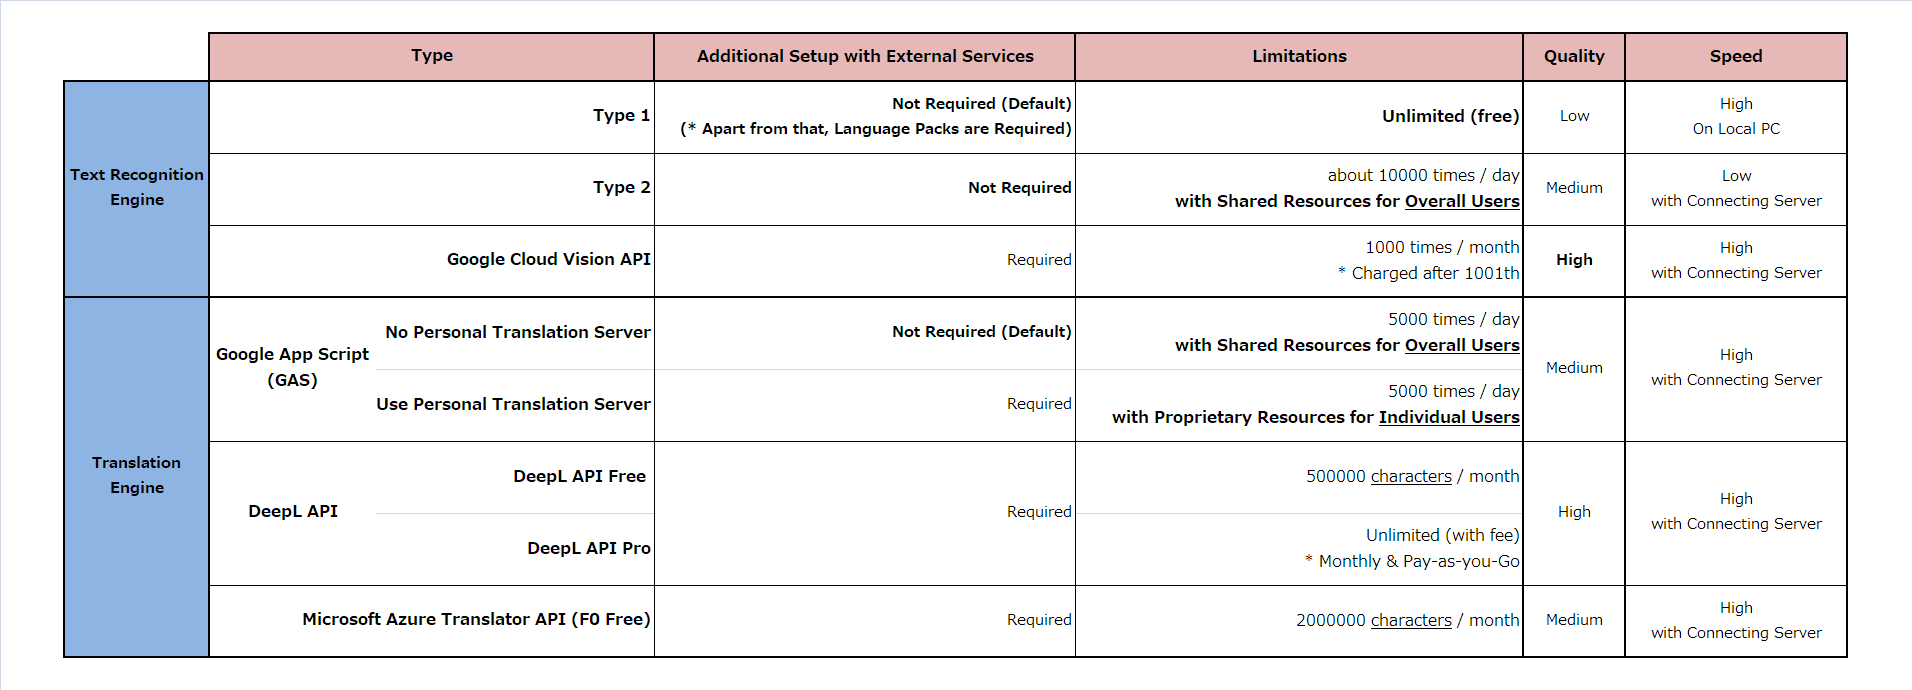
About Default Text Recognition Engine
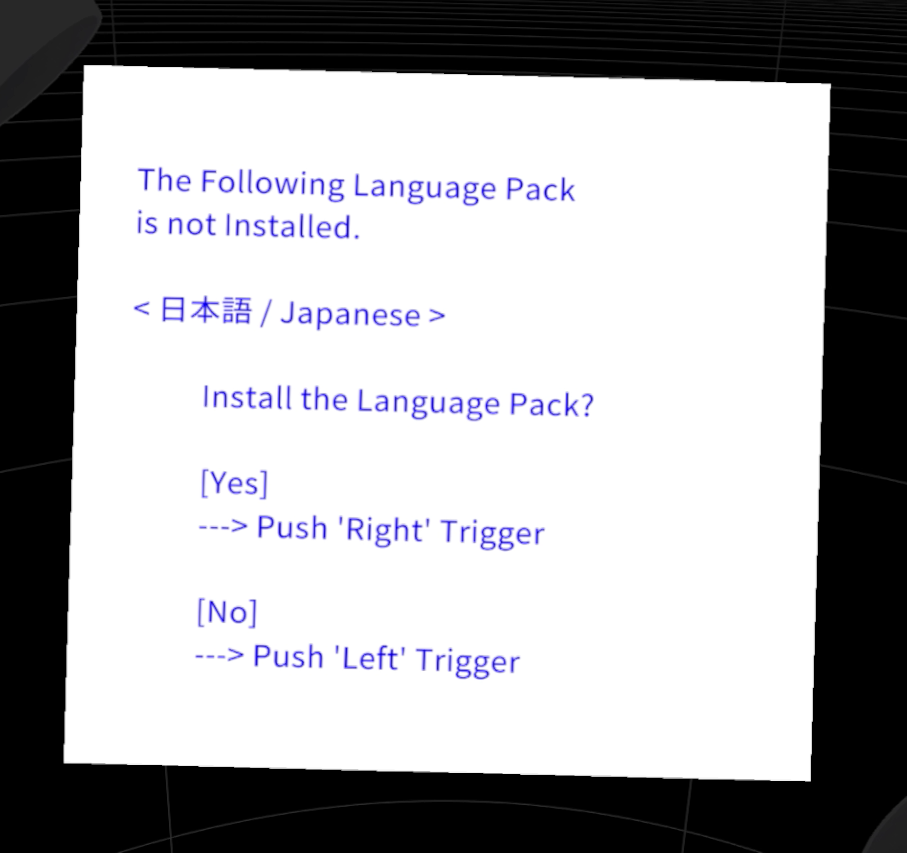
The default text recognition uses the engine provided by Windows system. To use it, you need to install the Windows language pack corresponding to each language.
From v1.4.0 onwards, You can install the language packs required for character recognition from VR.
The following panel will be displayed when text recognition is performed for the first time.
Push the right trigger while holding both grips to begin installing the language pack for character recognition.
Depending on the Internet connection environment, it takes about 1-5 minute to complete the installation.
If the installation is not completed after 5 minutes, the installation will be interrupted.
About automatic installation of language packs
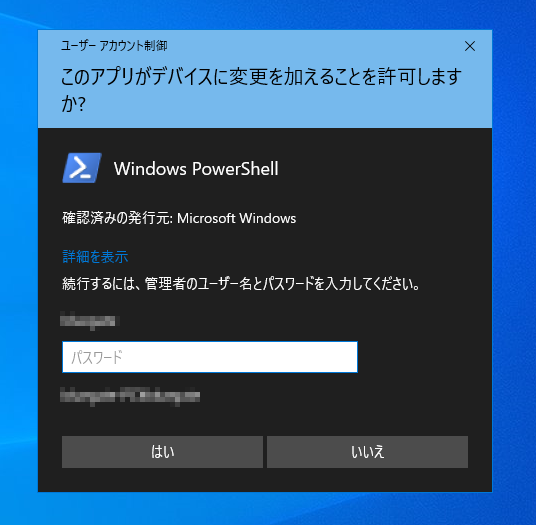
Windows administrator privileges are required to run the automatic language pack installation.
If the account is not administrator, the following window may appear on the desktop asking for an administrator password. This is correct operation, so if there is no problem with installing the language pack, proceed with input and select “Yes”. The installation of the language pack will start after confirmation of administrator rights.
If the automatic installation fails, please refer to Microsoft’s official manual and install manually.
When installing manually, make sure that the “Set as my Windows display language” item is unchecked.
Also, depending on the Windows environment you are using, you may not have ExecutionPolicy the PowerShell file. In that case, launch a new PowerShell window with administrator privileges and run the Set-ExecutionPolicy command.
This command rewrites the environment settings of your PC. Please refer to the official Microsoft documentation below to understand the meaning of the command before executing it.
about Execution Policies – PowerShell | Microsoft Learn
Set-ExecutionPolicy RemoteSigned -Scope Process -Force
Set-ExecutionPolicy RemoteSigned -Scope LocalMachine -Force
Uninstall Auto-installed Language Packs
Right-click the included file “uninstall_ocr_language_packs.ps1” script and select “Run with PowerShell”. Language packs for OCR other than the Windows system language will be uninstalled.
*If you installed language packs manually , the above script will not completely remove language packs, so please uninstall them from the Windows settings menu.
About Default Translation Engine
The default translation engine uses an external translation server called Google App Script (GAS), and the number of translations is limited (5000 times/day). In the default state, one translation server is shared by all users, so all users share 5000 translation resources per day.
If you want to make full use of translation resources, please set up a personal translation server.
For more information on how to install a personal translation server, please refer to the following additional manuals.
Appendix:Deployment of personal translation server
About Using Google Cloud Vision API for Text Recognition
VRHandsFrame also enables highly accurate text recognition to use Google Cloud Vision API.
If you want to read special decorative fonts or characters in backgrounds, recommend using the Vision API.
To use the Vision API, it is not necessary to install a language pack, but additional settings are required.
Due to the use of Google’s service, there is a limit of 1000 times/month of character recognition that can be used for free, and 1001 times or more will be charged to Google’s service.
See additional manuals below for details.
Appendix:Use Google Cloud Vision API
Please Select the “Translation” tab to change the settings on the dashboard.
[Language for Text Recognition]
Set the translation source language. (up to 24 languages)
[Language to Translate]
Set the translation target language. (up to 24 languages)
When the source and target languages are the same, the text recognition results are displayed. Please use this function to check the recognition accuracy.
[Text Recognition Engine]
Select a text recognition engine.
<Type1>
Use Windows Media OCR for text recognition.
It is a default setting and available without additional settings.
It runs on a local PC. To use it, you need to install a language pack.
<Type2>
Use a dedicated private Google Drive for text recognition.
it have to communicate with the external server. Available without additional settings.
<Vision API>
Use Google Cloud Vision API. It supports 24 languages. It is a highly accurate text recognition engine.
It have to communicate with the external server. It is necessary to obtain and set an API key.
[Translation Engine]
Set the translation engine. By default, Google App Script (GAS) is used.
If you wish to use an additional translation engine, set the API key you obtained in the following Config file.
To use an additional translation engine, open the preferences menu from desktop and set an API key.
<Default>
Use Google App Script(GAS). Default setting.
<DeepL>:
Use DeepL API (Free/Pro). API key setting is required.
<Azure>
Use Microsoft Azure Translator API. API key setting is required.
Please select “global” for the resource region in Azure Settings Web Page.
<Mix>
Basically, use DeepL API.
For languages not supported by DeepL API (Traditional Chinese, Korean), use Azure API or GAS.
[GAS Key]
Set up a Google Apps Script API Key (GAS Key) for your personal translation server.
Please refer to the additional manual for setting up.
7. 2D Code Reading Function / Settings ▼ ▲
The 2D code displayed on the image in the frame is read.
Place the 2D code in the frame from the front, avoiding an oblique angle as much as possible. If the reading result is a URL, press the trigger to open the browser on the desktop.
Please go to the “2D Code” tab to change the settings on the dashboard.
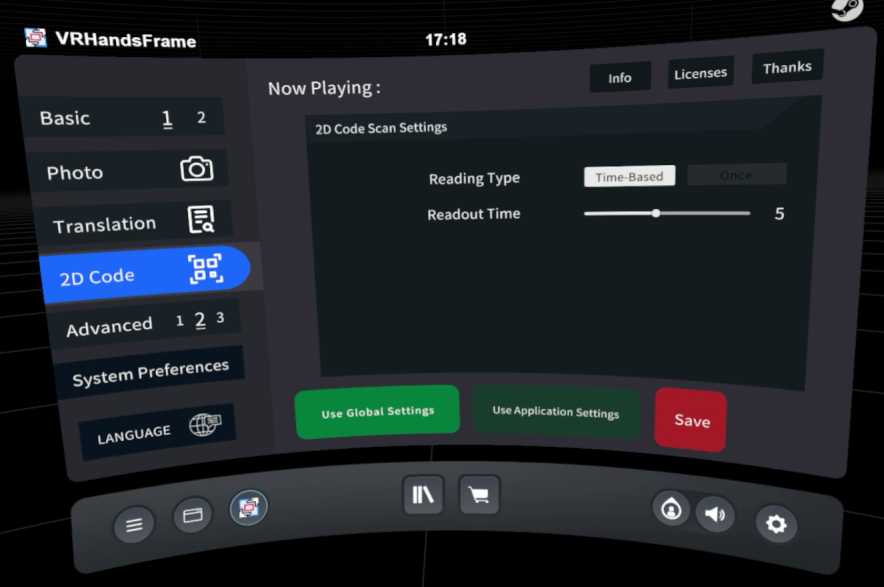
[Reading Type]
Select the reading type of the 2D code.
<Time-Based>
Attempts to read multiple times within the set time limit.
<Once>
Reading is performed only once at the timing of frame confirmation.
[Readout Time]
Set the readout limit time( available on using Reading Type)
8. Advanced Settings ▼ ▲
You can change the advanced settings of VRHandsFrame.
To change the settings, select the “Advanced” tab.
Since there are multiple setting screens, each selection switches the page.
Advanced Settings 1
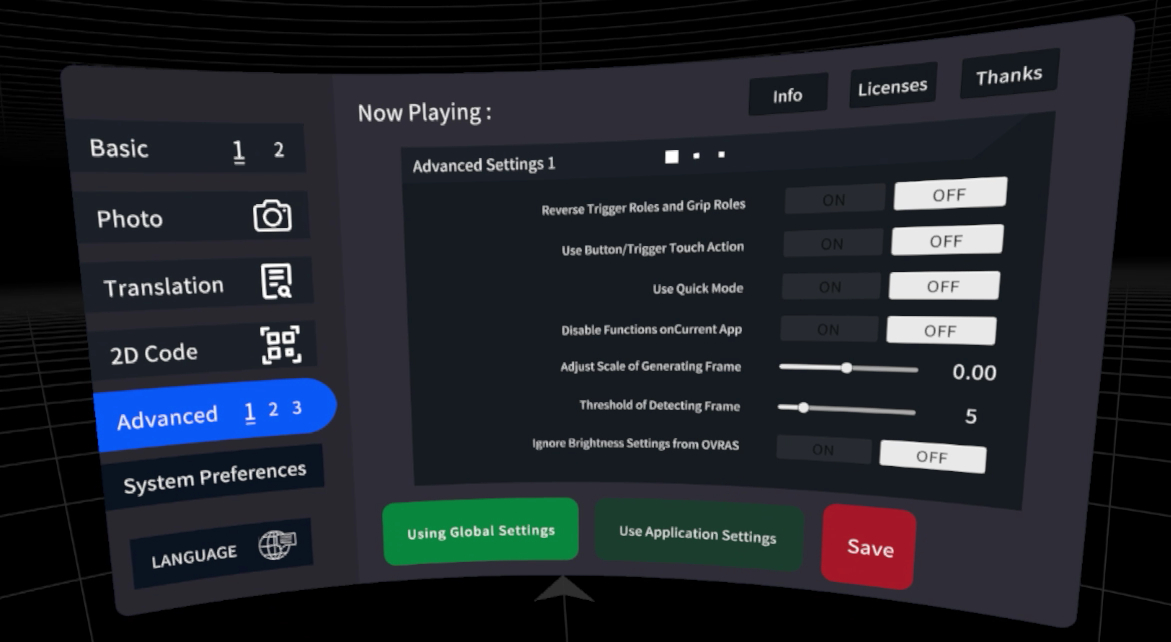
[Reverse Trigger Roles and Grip Roles]
Turning the setting ON will swap the roles of the trigger and grip on the VRHandsFrame.
[Use Button/Trigger Touch Action]
When the setting is turned on, the touch of the “button” and “trigger” can be assigned to perform hand sign conditions and functions instead of pressing the “grip” and “trigger”.
* Some controllers do not support touch operation of triggers due to hardware specifications.
Binding of various controllers when [Use Button/Trigger Touch Action] is turned on
| Controllers | Generate the frame | Fix the frame |
|---|---|---|
| Oculus Touch Controller | Touch right A + left X button | Touch trigger |
| Vive Controller | Touch Right + left trackpad | Touch trigger |
| Index Controller | Touch right A + left A button | Touch trigger |
| Vive Cosmos Controller | Touch right A + left X button | Press trigger |
| Windows MR Controller | Touch Right + left trackpad | Press trigger |
[Use Quick Mode]
When this option is turned on, the frame selection process will start when you press the trigger and grip on both controllers at the same time.
You don’t need to point the controller at a specific angle like you would with a normal frame selection start operation. The default setting is OFF.
[Disable Functions while Running Current App]
Turning the setting ON will disable VRHandsFrame all functionality when using the current app.
(assumes use of Application Settings)
[Adjust Scale of Generating Frame]
Adjusts the size of the generated frame.
The larger this value is, the closer the frame generation criteria will be to the midpoint of both hands.
The smaller this value is, the farther the frame generation criteria will be to the midpoint of both hands.
(This is intended to be used as a workaround for cases where the frame is covered by the avatar’s hands.)
[Threshold of Detecting Frame]
Sets the threshold for frame detection. (Default value: 5)
If frames cannot be detected due to differences in CPU or HMD rendering processes, increasing the threshold may improve the problem.
[Ignore Brightness Settings from OVRAS]
Ignore the brightness settings of another overlay application “OVR Advanced Settings” while VRHandsFrame functions are running.
Advanced Settings 2
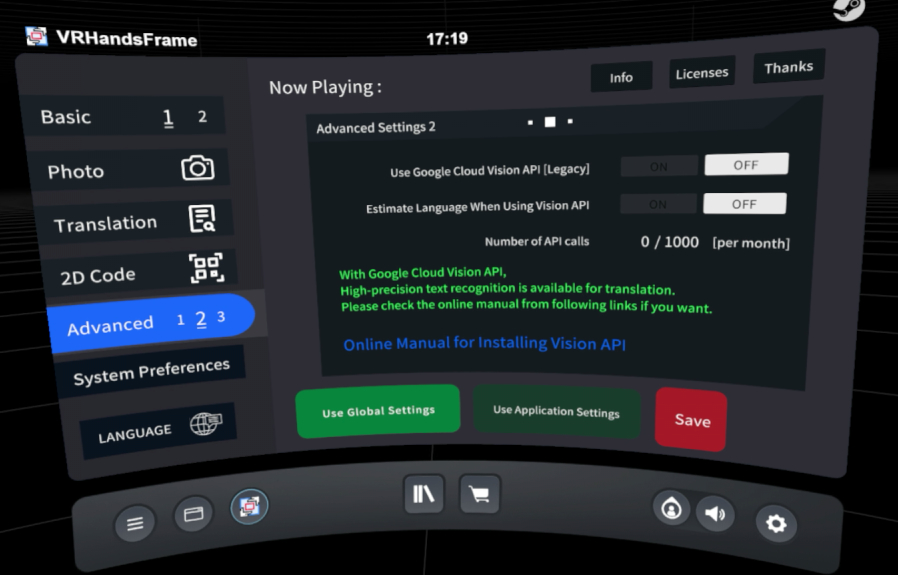
[Use Google Cloud Vision API (Legacy)]
This is a legacy settings. It remains for compatibility with the old version.
Normally there is no problem with OFF.
To use Google Cloud Vision API, switch the [Text Recognition] Setting.
[Estimate language When Using Vision API]
Estimates the language of text recognition when using Vision API. Note that the language may be recognized as different from the expected language.
When enabled, the [Language for Text Recognition] setting is ignored.
Languages other than supported languages can also be recognized and translated, but the incidence of misrecognition will be higher.
Advanced Settings 3
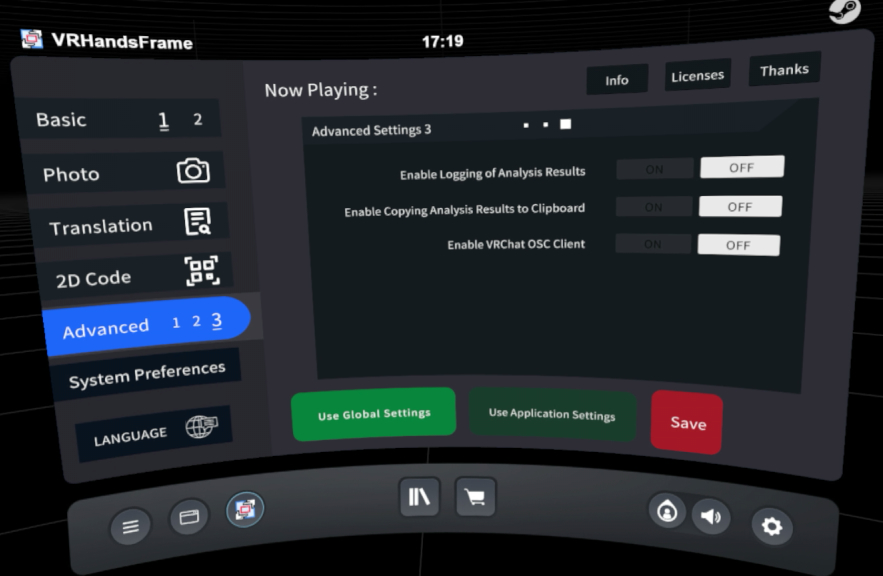
[Enable Logging of Analysis Results]
Translation results and 2D code reading results are output as a CSV file.
The file “reslut_log.csv” is output to the location where VRHandsFrame.exe is located.
[Enable Copying Analysis Result to Clipboard]
Translation results and 2D code readings are copied to the clipboard.
[Enable VRChat OSC Client]
Use the OSC function to display results in the text chat box of VRChat.
9. System Preferences ▼ ▲
You can save and change your [System Preferences].
[System Preferences] are stored separately on the local PC, regardless of [Global Settings] and [Application Settings].
Change preferences on the dashboard from the [System Preferences] tab.
There is no need to select the [Save] button because [System Preferences] are automatically updated when the value is changed.
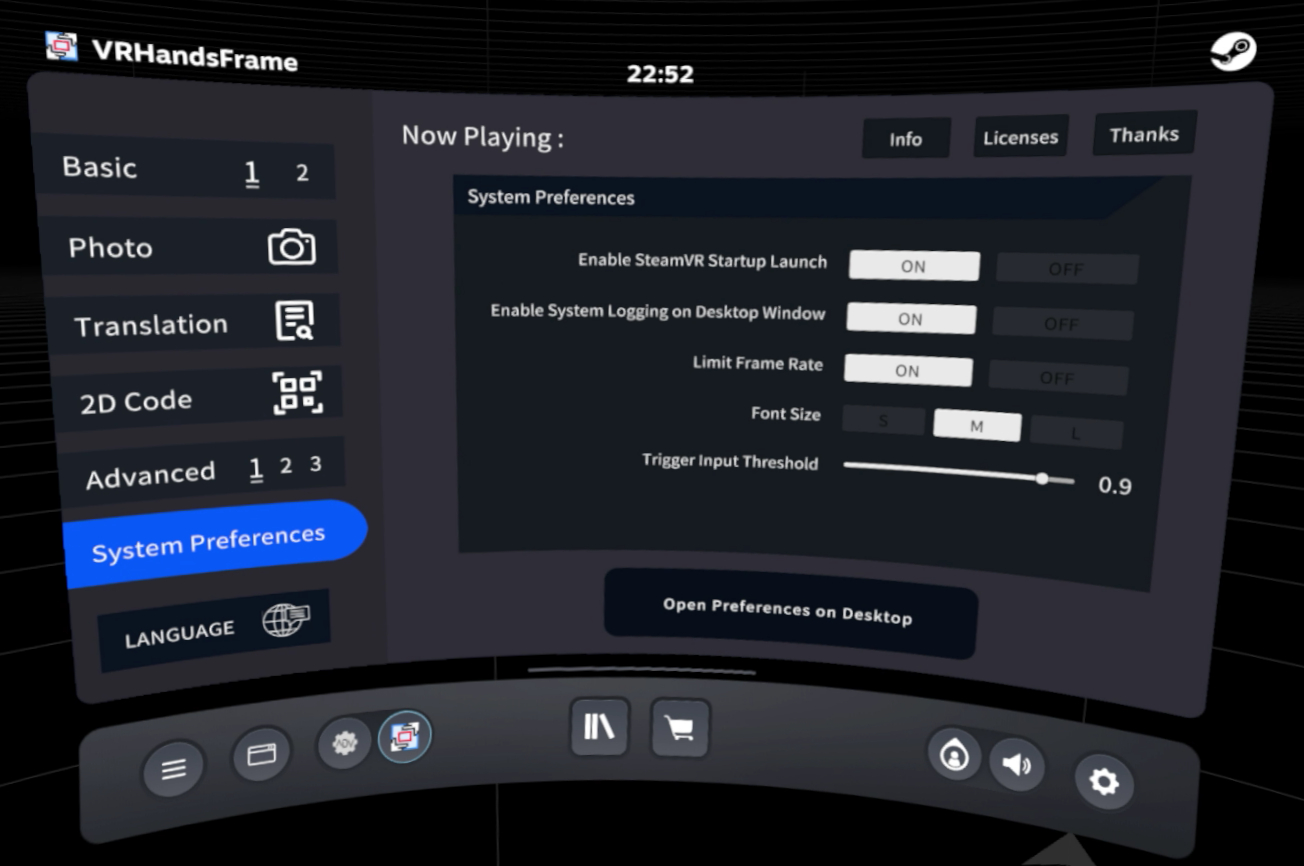
【Enable SteamVR Startup Launch】
Switch ON/OFF of SteamVR startup launch setting. It is ON by default.
【Enable System Logging on Desktop Window】
When turned ON, system logs such as errors during image analysis will be displayed on the desktop window. It is ON by default.
【Limit Frame Rate】
Limit the frame rate to 60 fps. The default setting is ON.
【Font Size】
Sets the font size on the result panel in VR.
【Trigger Input Threshold】
Sets the trigger input threshold. The smaller the value, the less the amount of trigger depression required to confirm each action.
10. Change Preferences from Desktop ▼ ▲
Some settings are configurable from the desktop.
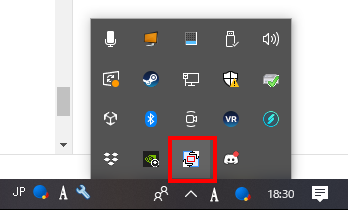
To open the settings screen, click gear icon on the desktop window or right-click the icon in the task tray and select [Preferences] from the displayed menu.
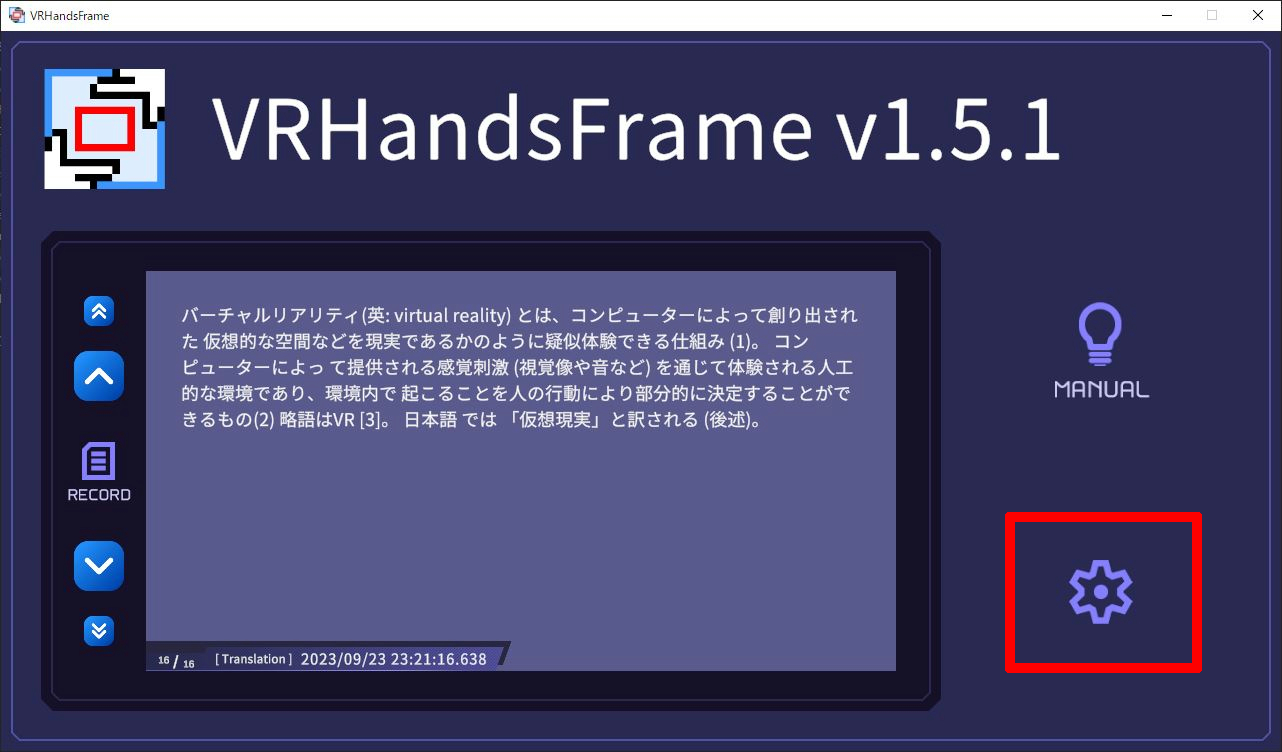
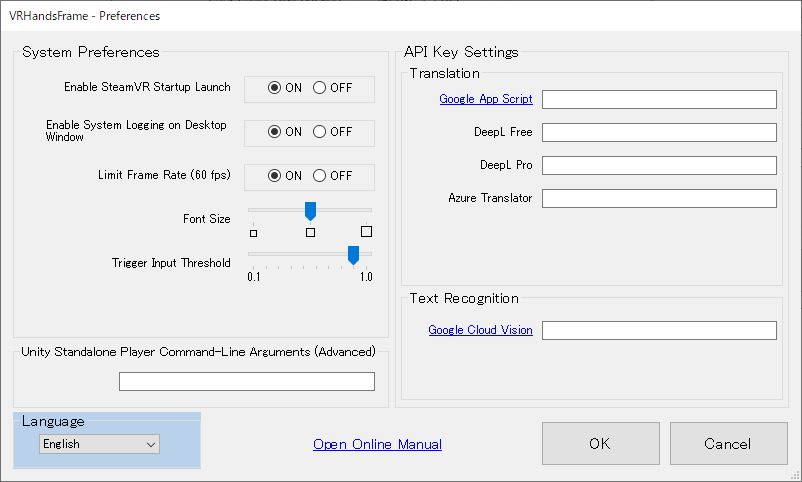
【System Preferences】
Change the [System Preferences].
【API Key Settings】
Set the API key used for translation and text recognition.
【Unity Standalone Player Command-Line Arguments】
Set command-line arguments when launching the application.
【Language】
Change the displayed language. (Japanese or English)
11. Transfer of configuration data ▲
When upgrading VRHandsFrame or when you want to install VRHandsFrame on a different PC, you can take over the configuration data.
Each VRHandsFrame configuration data is saved in json format files in the following folder.
If you want to take over the configuration data, copy the entire [folder for configuration] to the same location in the new VRHandsFrame, or copy the json files individually.
[folder for configuration]
\VRHandsFrame_Data\StreamingAssets\config

[Global Settings File]
\VRHandsFrame_Data\StreamingAssets\config\global.json

[Application Settings File]
\VRHandsFrame_Data\StreamingAssets\config\[Application Name]\settings.json